Overview:
We will walk you through on how to bulk upload Compensation Data to the system. Just follow the steps below.
TABLE OF CONTENTS
Bulk Upload Compensation Data
Step 1: Please write in to support@omnihr.co to request for the bulk upload template.
Step 2: Fill up the template accordingly
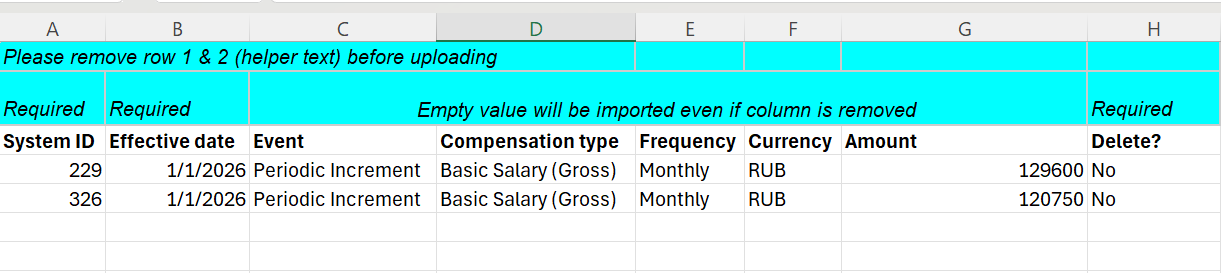
Here are some things to remember about the template as you are filling up:
- Column A | System ID
- You can get this by generating an employee list through the Reports module. The first column in the report shows the system ID of the employees.
- Column B | Effective date
- This column is required.
For each employee, the effective date should always be unique per event / row.
- Column C | Event
- You should first check the available Compensation Events in the system before filling up.
- You could do this by going to your own profile > Compensation Section > Hover mouse over the section and click Schedule a Change > Click the Events dropdown to see the available Compensation events.
- Please be advised that compensation events are fixed in the system.
- Column D | Compensation Type
- You should first check the available Compensation Type in the system before filling up.
- You could do this by going to your own profile > Compensation Section > click Schedule a Change, and click the Compensation Type dropdown fields to see the available Compensation type options.
- If what you want to input is not available, you can add on the spot in the dropdown fields. You can also go to Settings > Field Management > Compensation> Select Compensation Type field > Check the options is available > if not, can add to the options.
- Column E | Frequency
- You should first check the available Frequency in the system before filling up.
- Indicate if frequency is Monthly, Daily, Hourly, Annually, Bi-weekly, Weekly, or Quarterly
- You could do this by going to your own profile > Compensation Section > click Schedule a Change, and click the Frequency dropdown fields to see the available Frequency options.
- Column F | Currency
- You should first check the available Currency in the system before filling up.
- The currency should be in the format support by the system (e.g. USD instead of $).
- You could do this by going to your own profile > Compensation Section > click Schedule a Change, and click the Currency dropdown fields to see the available Currency options.
- Column G | Amount
- Input the amount.
- Input the amount.
- Column H | Delete?
- Please tag all entries / rows as 'No' for the upload to be successful.
- If you wish to delete an existing data in the system, indicate ‘Yes’
Step 3. Upload the template in your Omni URL through "(company name).omnihr.co/new-import".
For example, if your Omni URL is omnihr.omnihr.co, you will want to upload through "omnihr.omnihr.co/new-import".
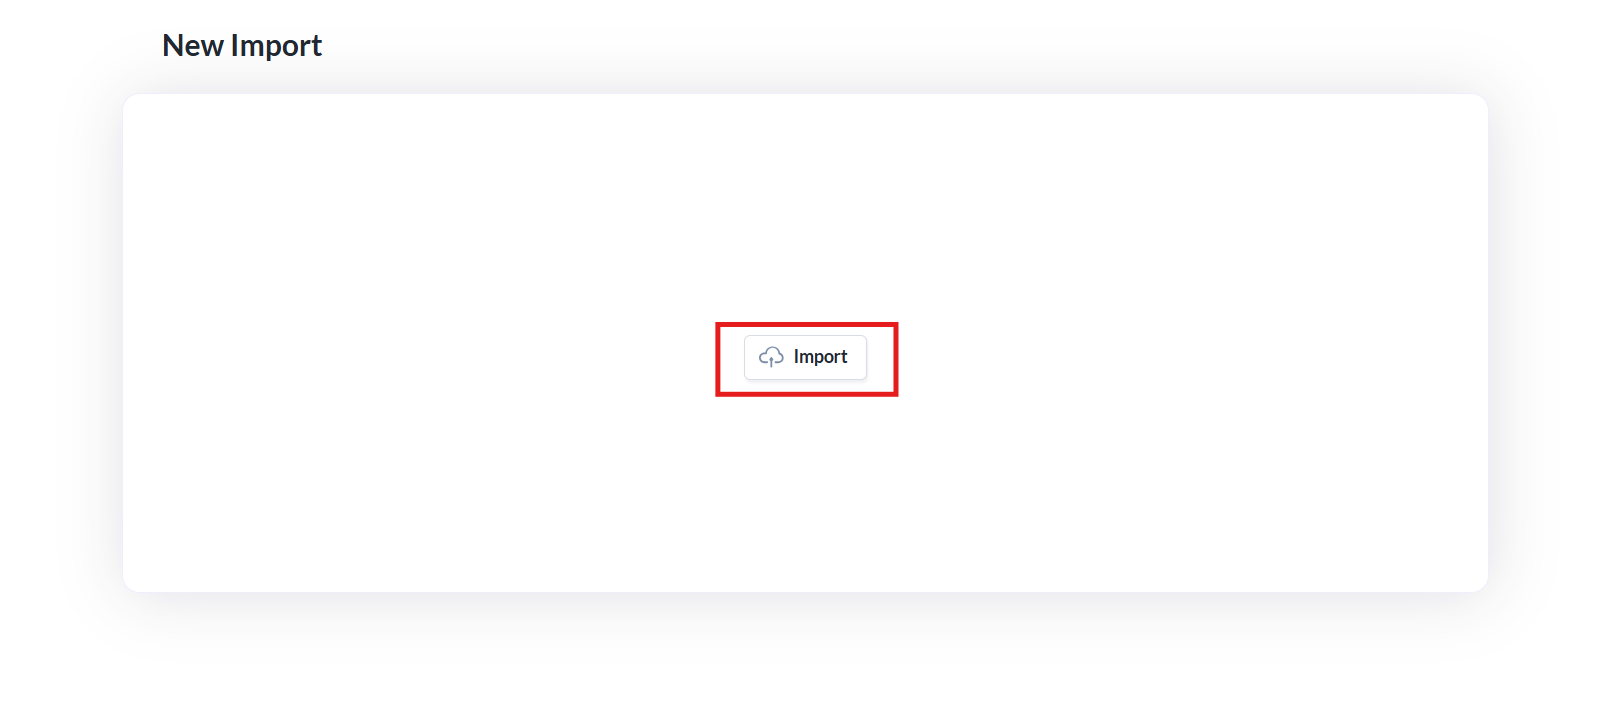
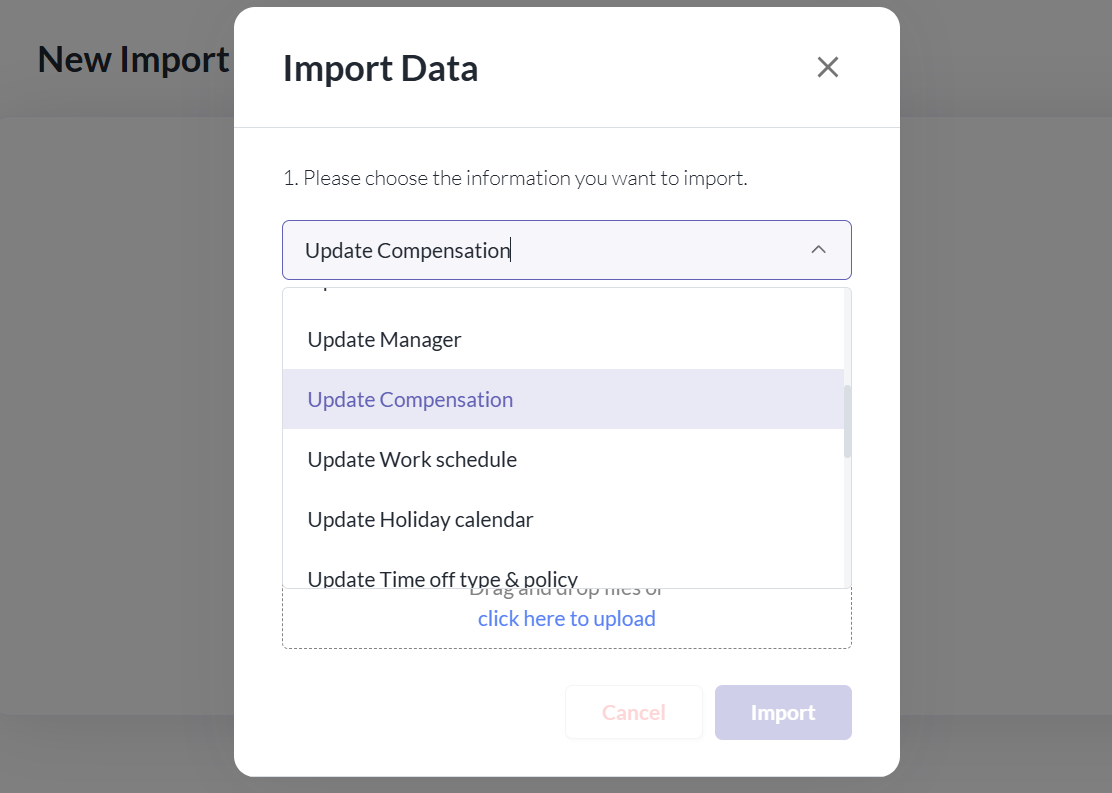
Step 4. Once you're in the link, please click Import > select Update Compensation from the dropdown. From here, you may attach the file and click 'Import' afterwards.
Step 5. You will be receiving an email with an attached file which you may check to see if all the entries are updated / imported successfully. It will indicate 'Success!' if the row is upload successfully; otherwise, it will show the details why it did not push through. Adjust the upload template accordingly if with failed entries, then try uploading again.
Best Practices for Bulk Import Compensation Data
This are the best practices we recommend to ensure a smooth and error free process:
- Generate the master report from report module beforehand as a source of truth to ensure you have a backup reference of the current data before performing any bulk import.
- To import with 1–2 records first. Once confirmed successful, you may proceed with the remaining records.
Still Need Help?
Reach out to our support team should you need further assistance.
Was this article helpful?
That’s Great!
Thank you for your feedback
Sorry! We couldn't be helpful
Thank you for your feedback
Feedback sent
We appreciate your effort and will try to fix the article